In addition to automatic classification, the classification can also be done manually. If you have not already defined the document type during the upload and the automatic classification has not delivered a clear result, you have to assign the document to a document type manually.
Document Classification Overview
Via Documents > Classification you get to the overview of all documents that need to be classified manually. The status of the entries is "classification validation".

The "Classification" button opens the interface where the user can perform the classification. You can also open the "Serial mode" to process all documents one after another.
Document Classification Interface
The document classification interface is divided into four sections. On the left side there is a preview window of the selected page, on the top right there is the user interface with the individual buttons, in the middle right there is a list of all document types. If the system has already a prediction for the document type, percentage values are displayed in braces. On the bottom right there are predefined comments, e.g. "Unreadable", if it is not possible to process the document, write individual comments and the possibility to exclude the document from the training.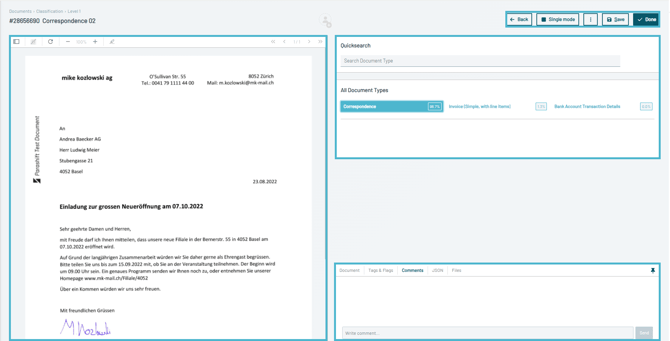
To assign a document manually, mark the corresponding class and confirm the selection with the "Done" button.
As a rule, each document is transferred to the training data after completion. Here, both the identifiers for the classification and the values from the extraction are included.
If, for example, documents of a document type are tested that are not representative of this document type, the option "not for training" should be activated so as not to negatively influence the quality of the training.
Buttons
| The "Back" button takes you back to the document classification overview. | |
|
|
The Parashift Platform distinguishes between a "Single mode" and a "Serial mode". This controls the behavior after pressing the "Done" button.
|
 |
If you are in "Serial mode", you can skip the current document and the next document will open. |
 |
There are three (organizational) stages for the individual validation steps of separation, classification and extraction. If a user is not sure about the current document, it is possible to forward this to another stage. |
 |
If you recognize here that the separation was not carried out correctly, the document can be sent back to the separation. A PopUp will be shown to confirm this action. You can leave a comment and follow the document to the separation. In this context the document will be closed and reopened automatically in the manual separation interface.
|
|
The "Save" button allows you to save the current changes to complete the editing later. |
|
|
Use the "Done" button to confirm the correctness of the classification. Depending on the mode selected, you can return to the overview or go directly to the next document. |
|
|
If you enable this option, the document will not be added to the training data. |
|
|
|
If the document can't be processed, the predefined buttons can be used to set a special status to the document and close it. Short Cuts: [ctrl + alt + d] = Unreadable [ctrl + alt + b] = Unprocessable [ctrl + alt + o] = Out of scope [ctrl + alt + m] = Page missing [ctrl + alt + i] = Page incomplete [ctrl + alt + n] = Multiple documents on page |


