Parashift Flows lets you integrate Parashift with your existing systems and business processes more easily and flexibly. Use Flows to cover additional input channels (for example: monitoring an FTP server), transform document data into custom formats, and automatically forward results to downstream systems — for example posting a goods-receipt to an ERP system or saving and tagging a document in a DMS. These end-to-end automations work provided the target systems are accessible from Parashift.
How Flows work (high level)
A Flow is built from connectors, which are placed on a canvas and linked together via ports to form a processing pipeline. Each connector exposes one or more actions. Conceptually split actions into triggers and actions:
-
Trigger: an event that starts a Flow (e.g., a new file appears in a watched location).
-
Action: a processing step that consumes data or a file and produces output for the next connector (e.g., download the file, run recognition, convert the output, or send it to a downstream system).
Important: a trigger such as New File only provides metadata about the new item. You must add an action that retrieves the file (for example FTP - Download File) if the Flow needs access to the file content.
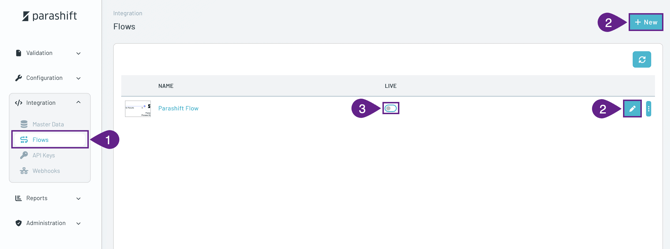
Accessing and managing Flows
- Open
Integration > Flowsto see the list of available Flows. -
Create new Flows or edit existing ones.
-
Toggle the Live attribute to enable or disable a Flow. When Live, the Flow is active and will react to triggers.
Flow editor — UI overview
The Flow editor is split into four areas:
-
Left — Connector library: a list of available connectors (for example
FTP,Microsoft OneDrive,HTTP,Converters,Controls). -
Center — Canvas: drag connectors from the left into this area and arrange them to build the Flow.
- Bottom — Logs: runtime log entries for the Flow and each connector; a first place to look when troubleshooting.
-
Right — Action & configuration panel: select which action the connector should run (for example
New Filetrigger orDownload Fileaction) and set action-specific parameters.
.png?width=670&height=348&name=Screenshot%202026-07-02%20at%2009.00.13%20(1).png)
To configure a connector, select it and choose an action from the drop down in the right-hand panel. Some connectors need a Connect Account (credentials and connection parameters). For example, the FTP connector requires server, username, and password. Some actions also expose input variables (for example Path) that scope or control the action.
Connectors are linked by dragging from an output port of one connector to an input port of another. The port wiring defines the data path and the order of processing.
Note: some converter actions expect a file reference (e.g., fileId) as input, whereas others expect the file content (string/JSON). Always check the action’s input parameter types when wiring ports and setting variables.
Triggers and actions
Triggers (Applications)
-
Microsoft OneDrive -
New File— Triggers when a new file is added to OneDrive. -
Microsoft SharePoint -
New File— Triggers when a new file is added to Sharepoint. -
Microsoft SharePoint -
Updated File— Triggers when a file in SharePoint is modified. -
Microsoft SharePoint -
Deleted File— Triggers when a file is deleted in Sharepoint. -
Microsoft Mail -
New Email— Triggers when a new message enters your inbox. -
Microsoft Mail -
Updated Email— Triggers when there is an update to a message in the user's inbox. -
Microsoft Mail -
Deleted Email— Triggers when a message is deleted from the user's inbox.
Triggers (Document Processing)
-
Email -
ReceiveIMAP— Triggers when there is an unread email in the user's inbox. Has text to PDF abilities.
Triggers (Utilities)
-
FTP -
New File— Triggers when a new file appears on the FTP server/directory. -
HTTP -
Webhook— Triggers when an HTTP request is received at a configured endpoint. -
Timers -
Cron Scheduler— Schedules jobs to run periodically at fixed times, dates, or intervals using cron syntax. -
Timers -
Scheduler— Schedules jobs to run periodically based on various time intervals (daily, weekly, monthly, etc.). -
Timers -
Timer— Triggers at the frequency provided by the user. -
Controls -
On Error-- Triggers when there is an error in the flow. -
Controls -
On Start-- Triggers when the flow starts.
Actions (Applications)
-
Microsoft OneDrive -
Export File-- Export a file to cache -
Microsoft OneDrive -
Move File Or Folder -
Microsoft OneDrive -
Upload File-- Upload a file to OneDrive -
Microsoft SharePoint -
Download File-- Download file to cache -
Microsoft SharePoint -
Move File Or Folder -
Microsoft SharePoint -
Upload File-- Upload a file to SharePoint -
Microsoft Mail –
Create Draft-- Create a draft email -
Microsoft Mail –
Download Attachment-- Download a message attachment -
Microsoft Mail -
Get Attachment-- Get message attachments -
Microsoft Mail -
Get Email-- Retrieves an email from your Outlook -
Microsoft Mail –
List Categories-- Retrieves all categories in mailbox -
Microsoft Mail -
List Emails-- Retrieves all emails from your Outlook -
Microsoft Mail -
List Folders-- Retrieves all folders in mailbox -
Microsoft Mail -
Mark Email as Read -
Microsoft Mail -
Mark Email as Unread -
Microsoft Mail -
Move Mail--Moves an email message to another folder -
Microsoft Mail –
Send Email-- Sends an email -
Microsoft Mail –
Update Category-- Updates the categories assigned to an email in your mailbox
Actions (Document processing)
-
Parashift-
Process Document-- Uploads a document to Parashift Platform for processing -
Email -
Send Email-- Sends emails using SMTP servers -
Converter (JSON) -
JQ-- Transform JSON to a customer-specific JSON using a JQ expression — expressions can be tested on https://play.jqlang.org) -
Converter (JSON) -
JSON 2 Text-- Converts JSON to text -
Converter (JSON) -
Text 2 JSON-- Converts text to JSON -
Converter (XSLT) -
XML 2 XML-- Transforms XML using XSLT -- expressions can be tested on https://www.w3schools.com/xml/tryxslt.asp?xmlfile=cdcatalog&xsltfile=cdcatalog) -
Converter (XSLT) -
Check XSD-- Checks an XML against an XSD schema -
PDF Converter -
Text 2 PDF-- Converts plain or HTML text to a PDF file -
PDF Converter -
Merge 2 PDF-- Merges two PDF files into one PDF file -
Encode/Decode -
Encode Decode-- Encodes or decodes text using Base64, Hex, or Binary formats -
Encode/Decode -
Clean Text-- Sanitizes, escapes, and normalizes a text
Actions (Utilities)
-
FTP -
Download File-- Download a file to cache -
FTP -
Rename File-- Rename or move file -
FTP -
Upload File-- Upload a file to the FTP server -
HTTP -
POST/PUT/PATCH/GET/DELETE-- Makes HTTP requests -
XML -
JSON 2 XML-- Converts JSON to XML -
XML -
XML 2 JSON-- Converts XML to JSON -
XML -
XPath-- Extracts data from a specific tag via an XPath expression -
XML -
Validate XML-- Validates XML -
CSV -
Create CSV-- Creates a CSV file from text -
CSV -
Add row-- Adds a row to the end of a file -
CSV -
Add rows-- Adds multiple rows to the end of a file -
CSV -
Add column-- Adds a new column -
CSV -
Delete columns-- Deletes columns -
CSV -
Delete rows-- Deletes rows that matcha provided filter -
CSV -
Export CSV-- Reads a CSV and exports its text content -
CSV -
Get cell-- Returns the first cell that matches the provided filter -
CSV -
Get row-- Returns the first row that matches the provided filter -
CSV -
Get rows-- Returns the rows of a file -
CSV -
Import CSV-- Imports a CSV -
CSV -
Rename column-- Renames a column -
CSV -
Update rows-- Updates all of the rows that match the provided filter -
Converters -
CSV 2 XLSX-- Converts a CSV file to XLSX -
Converters -
XLSX 2 CSV-- Converts XLSX to a CSV file -
Converters -
JSON 2 CSV-- Converts JSON to a CSV file -
Converters -
CSV 2 JSON--Converts a CSV file to JSON
Actions (Flow Control)
-
Controls -
Each-- Loops through each value of a list -
Controls -
Set Variable-- Sets the value of a variable -
Controls -
Condition-- Evaluates expression(s) and sends data to the true or false ports -
Controls -
Switch-- Allows multiple outputs for different values of a variable -
Controls -
Join-- Joins multiple connections -
Controls -
Join Each-- Used in combination of the Each component -
Controls -
Code Block-- Allows use of JavaScript code to transform data -
Controls -
Stop Flow-- Stops the flow -
Controls -
Counter-- Increments an internal counter each time a value passes through -
Controls -
Digest-- Compiles data in a single batch -
Filters -
Equal-- Checks if value equals x -
Filters -
Not Equal-- Checks if value does NOT equal x -
Filters -
Contains-- Checks if value contains x -
Filters -
Greater Than-- Checks if value is greater than x -
Filters -
Less Than-- Checks if value is less than x -
Filters -
Is Not Empty-- Checks if value is not empty -
Filters -
Modulo-- Checks if value is divisible by x -
Filters -
Range-- Checks if value is within range of x-y
Best practices
-
Only grant minimal access: use dedicated service accounts for connectors (for example, an FTP user restricted to a single directory).
-
Scope watches: use input variables like
Pathto limit what a trigger watches and avoid excess invocations. -
Test converters externally: validate complex JQ or XSLT expressions using their online playgrounds before adding them to the Flow.
-
Log early and often: check the logs of each connector and add variables during development to make troubleshooting easier.
-
Use idempotency: when posting to downstream systems, design the target API calls to be idempotent or include unique IDs to avoid duplicate bookings.
Troubleshooting
-
If a Flow does not start, check the Live flag in
Integration > Flowsand confirm the trigger conditions are met. -
Inspect the Flow logs at the bottom of the editor — each connector writes its result there and error messages are surfaced.
-
Verify credentials and network access for connectors (the target system must be reachable from Parashift).
-
If a trigger fires but subsequent connectors do not receive the file, check that a
Download File/Export Fileaction is present and correctly configured. -
Confirm whether the action expects a
fileIdor the file content and wire or assign variables accordingly.